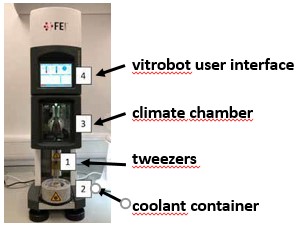
vitrobot
Table of Contents
Vitrobot procedure
The VitrobotTM (Vitrification Robot) is a fully PC-controlled device for vitrification (= rapid cooling) of aqueous samples
Before starting
- fill a dry 5 L tank with liquid nitrogen
- label grid boxes with the name of the experiment
- check plasma cleaner is reserved
- Assemble the necessary tools:
- EM_grids grids are available and present in sufficient number
- all part of the coolant container (make sure that they are dry)
- both vitrobot tweezers, big tweezer and blot paper clipping
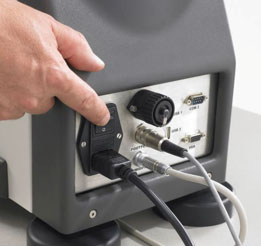
Starting up the vitrobot
- 1. close climate chamber's door if open
-
- 3. Make sure the humidifier is operational

-
- the white latch remains in open position after swith on the power.
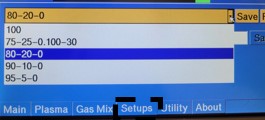
Set blotting process parameters
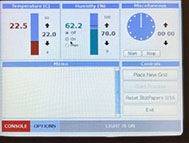
This step is done on the control panel, in the “options” page
- 1. 'blot total' needs to be '1' for blotting to occur
- 2. check 'Humidifier off during process' and 'Skip grid transfer' in the miscellaneous' side bar
- 3. Optional : set your desired blot time, force blot and waiting time (o for unsupported condition )
- all these setting are checked at the begining of the freezing cycle
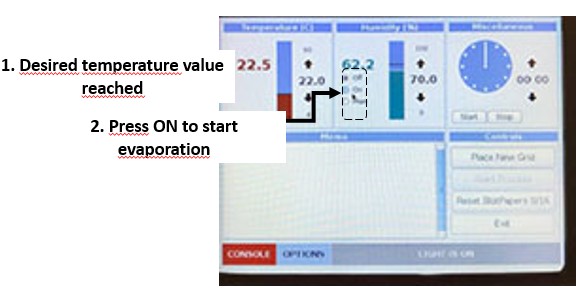
Set humidity and temperature parameters in climate chamber
This step is done on the control panel, in the “console” page
- 1. adjust desired temperature value
- 2. adjust desired humidify value
-
- take advantages from this waiting time to do the two following steps
- Mounting the filter papers
- load grids inside the plasma cleaner


Mounting the filter papers
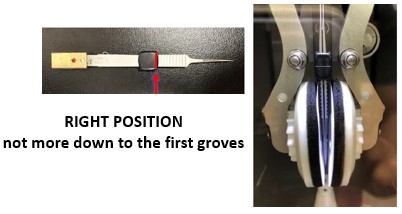
- IMPORTANT always wears gloves
- place blot papers onto the blotting pads with clipping ring
- support the blotting arms during assembling to prevent damage to the arms
load grids inside the plasma cleaner
-
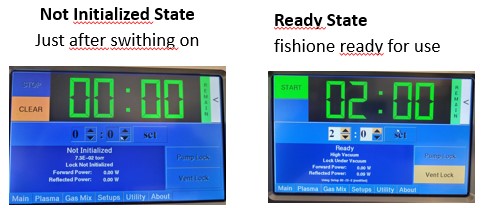
- fishione started with chamber locked under vaccum
- READY / HIGH VACCUM messages
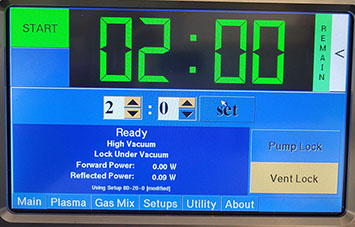
- 2. press Vent Lock to bring the chamber under atmospheric pressure
- State is reached when message Lock At Atmosphere appears
From now on IMPERATIVELY wears gloves
-
- the metallic drawer is ALWAYS stored in the chamber
- 5. close the door to prevent dust contamination inside the chamber
- 6. place EM_grids inside the metallic drawer
- generally sets of 4 to 8 IDENTICAL grids are loaded simultaneously
- 8. put back in place the metallic drawer inside the chamber
- on the plateform NOT on the inlet pump
- 10. press VACCUM to bring the chamber under vaccum
- State reached when message “HIGH VACCUM” appears
- 11. if not yet done on vitrobot, enable the humidity switchbox to start
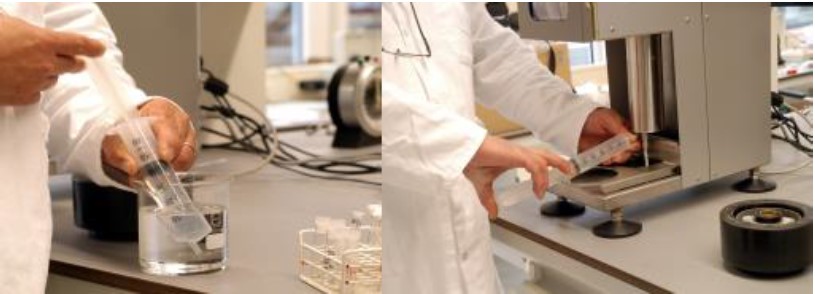
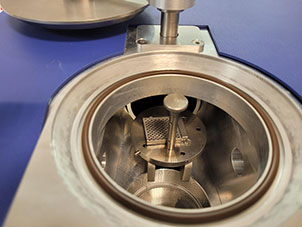
Assemble different part of the coolant container as pictured below

Cooling down the coolant container
- 1. Pour LN2 into both central ethan cup (A) and outer part (E) to faster the cooling
- 2. Wait for complete evaporation of the remaining nitrogen in the central part
- 3. up to now continously fill the outer part to maintain the Nitrogen level
- 4. wait 10 to 15 min for system to equilibrate
- 8. place grid box into the grid box platform (B)
- make sure that the grid box is labelled with the experiment name
plasma clean grids
- 1. Grids are already loaded inside the plasma cleaner
- 2. set desired plasma cleaning parameters :gas mixture/gas flow power
-
- commonly 90 s are used
- 4. press START to apply plasma on grids
- The gas plasma generated can be seen through the window as a pink light
- remaining time can be followed in the time display
- 5. press Vent Lock to bring the chamber under atmospheric pressure
- State is reached when message Lock At Atmosphere appears
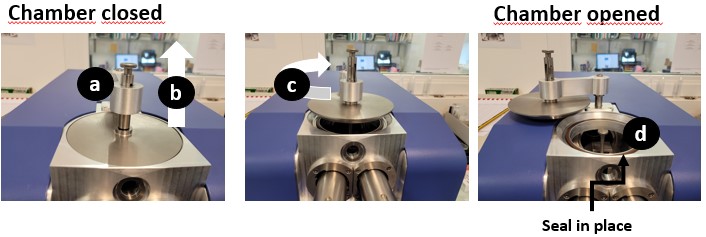
- 6. Open the chamber
- 8. close the door to prevent dust contamination inside the chamber
- 10. put the glass slide in a closed crystallizer to transfer safely grids to vitrobot bench
- 11. load or not new grids in the drawer and close it
- 12. put back in place the closed drawer on the support table
- 14. put back in place the metallic drawer inside the chamber
- on the plateform NOT on the inlet pump
- 15. close the door
- 10. press VACCUM to bring the chamber under vaccum
- either grids are waiting ready for an additionnal run of freezing at vitrobot (step 4-to 15)
- or the fishione remains on for next user
- At the end of the day, the fishione can be switch off
Everything is ready for plunge freezing sample:
  climate chamber is equilibrated in temperature and humidity.
  Filter paper are mounted
  ethane is liquefied
  Grids are freshly plasma cleaned
Start freezing at the vitrobot
- 1. check that the correct freezing parameters are entered
- 2. click on “place new grid” to bring in loading position the plunge rod
- 3. Lock a Glow discharged grid on tweezers
- Grasp as little of the grid as possible with the tweezers (but enough that it will not fall out during freezing)
- 4. then fix the tweezers onto the plunge rod
- with the support film support on the right for right-handers and on the left for left-handers
- 5. press on “continue” to bring up the tweezers into the blotting chamber
- 6. place the container onto the ethane lift
- Always check that ethane is at right temperature
- 7. press on to lift it
- 8. click on “process”
- 9. apply sample to grid
- 10. click on “continue” to blot and plunge
- 11. carrefully detach tweezers from the plunge rod
- 12. By maintaining the grid inside the ethan cup, place the coolant container on the table
- 13. transfer grid to the grid position
- 14. Dry tweezers
- 15. then repeat sequence 1-14 for all glow discharged grids
vitrobot.txt · Last modified: by 127.0.0.1